I set this up because ad blocking had become a device-by-device chore. My laptop was covered, but phones, mobile games, smart TVs, and random apps each found their own way around browser extensions. I had a Raspberry Pi Zero 2 W sitting around, and the idea of fixing the problem once—at the network level—was much more appealing than maintaining blockers everywhere. That is the same advantage highlighted in Raspberry Pi's network-level Pi-hole walkthrough: even devices that cannot run an extension still use the network's DNS.
I also wanted to learn what was happening behind the scenes. Instead of sending every lookup to a public DNS provider, I wanted the Pi to resolve domains itself. And if the setup worked at home, I wanted it to follow my phone onto cellular. That turned a basic Pi-hole install into a small but surprisingly capable network appliance.
| Part | My build |
|---|---|
| Board | Raspberry Pi Zero 2 W, 512 MB RAM |
| OS | Raspberry Pi OS Lite, 64-bit |
| DNS filter | Pi-hole v6 |
| Resolver | Unbound on 127.0.0.1:5335 |
| Remote access | Tailscale |
| Operations | unattended-upgrades, vnStat, log2ram, custom status page |
The design
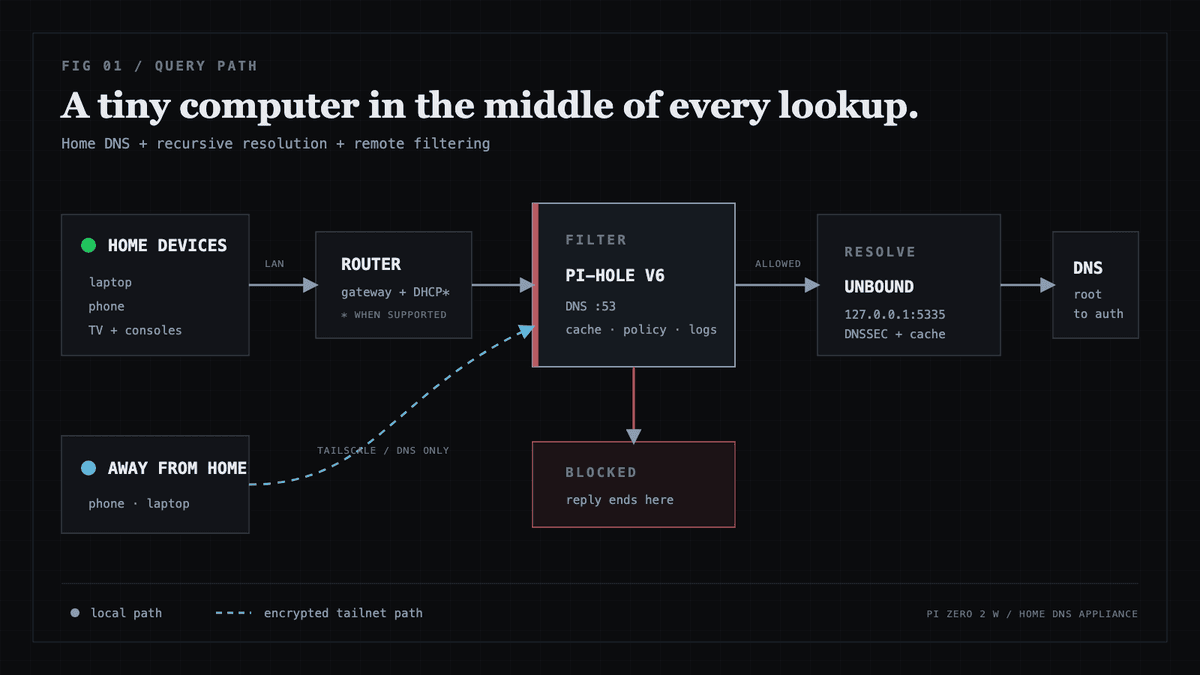
Pi-hole answers every DNS request first. Blocked domains stop there. Allowed domains go to Unbound, which resolves them from the DNS hierarchy instead of forwarding the full query stream to one public resolver.
The Zero 2 W was easily enough for this job: my system used roughly 200–230 MB of RAM and idled around 47°C. The harder problem was not compute—it was making one tiny computer a safe dependency for the entire house.
Before installing: choose your failure mode
Three decisions matter more than the blocklist:
- Give the Pi a stable address. Use a router reservation or a carefully tested static address before pointing clients at it.
- Run exactly one DHCP server. Prefer letting the router advertise Pi-hole as DNS. Use Pi-hole for DHCP only when the router cannot hand out a custom DNS server.
- Choose filtering or fallback. A public “secondary DNS” is not guaranteed to sit idle; clients may use it while Pi-hole is healthy. The Raspberry Pi setup guide specifically warns that a non-Pi-hole secondary can let blocked requests succeed. For strict filtering, use only Pi-hole—or run a second Pi-hole. I chose a public fallback because keeping the household online mattered more than catching every query.
1. Install Pi-hole
Start with Raspberry Pi OS Lite, patch it, and use the current official Pi-hole installation method:
sudo apt update && sudo apt full-upgrade -y
curl -sSL https://install.pi-hole.net | bash
Select the active network interface, keep the web interface enabled, and set a strong admin password. Then test both an allowed and a blocked lookup from another machine:
dig example.com @PIHOLE_IP
dig doubleclick.net @PIHOLE_IP
The first should resolve. The second should return Pi-hole's configured blocked response. Do this before changing the router; it gives you a known-good checkpoint.
2. Add Unbound, optionally
Unbound is not required for ad blocking. I added it because I wanted local recursive resolution and DNSSEC validation.
sudo apt install unbound -y
Use Pi-hole's maintained Unbound configuration guide rather than copying an old config from a blog. Its template listens locally on port 5335; Pi-hole then uses 127.0.0.1#5335 as its only upstream.
Verify DNSSEC before moving on:
dig fail01.dnssec.works @127.0.0.1 -p 5335
dig +ad dnssec.works @127.0.0.1 -p 5335
The failing domain should return SERVFAIL; the valid domain should return NOERROR with the ad flag.
My appliance eventually set qname-minimisation: no after a few CDN-hosted domains returned SERVFAIL. That was a targeted compatibility fix, not a setting I would copy by default. Start with the official config, inspect failures, and change one variable at a time.
3. Connect the router without locking yourself out
The clean path is to keep DHCP on the router and have it advertise the Pi's address as DNS. My Verizon router did not offer that in a useful way, so Pi-hole became the DHCP server too.
For that fallback design:
- Confirm the Pi's stable address and DNS service first.
- Configure Pi-hole's DHCP range, subnet, router address, and lease time.
- Only then disable DHCP on the router.
- Renew one client's lease and confirm that its DNS server is the Pi.
- Keep a rollback path to the router UI in case the Pi disappears.
Do not disable IPv6 automatically. First configure IPv6 clients to use Pi-hole, then verify their active resolvers. I disabled IPv6 because that router kept advertising an ISP resolver that bypassed Pi-hole; it was a limitation of that network, not a universal best practice.
4. Make filtering follow you with Tailscale
Tailscale let the Pi answer DNS for my phone away from home without exposing port 53 to the public internet.
curl -fsSL https://tailscale.com/install.sh | sh
sudo tailscale up --ssh --accept-dns=false --hostname=pihole
--accept-dns=false prevents the DNS server from trying to use itself through the tailnet. Then follow Tailscale's Pi-hole guide: allow Pi-hole to answer on the Tailscale interface, add the Pi's Tailscale address as the tailnet's custom nameserver, and enable Override DNS servers.
Pi-hole calls the broad listening option Permit all origins. Only enable it behind a firewall, protect the admin interface with a strong password, and never expose DNS or the dashboard directly to the internet.
5. Add the blocklists I used
The default list is a good start, but I wanted broader tracker, phishing, and mobile-game coverage. These were the four lists in my setup:
| List | URL |
|---|---|
| StevenBlack hosts | https://raw.githubusercontent.com/StevenBlack/hosts/master/hosts |
| HaGeZi Pro | https://raw.githubusercontent.com/hagezi/dns-blocklists/main/adblock/pro.txt |
| Phishing Army extended | https://phishing.army/download/phishing_army_blocklist_extended.txt |
| AdGuard DNS | https://v.firebog.net/hosts/AdguardDNS.txt |
After adding them under Adlists, run Tools → Update Gravity. Add one list at a time and test the sites and apps you care about; these overlap, and “more domains” is not automatically better.
For mobile games, the useful part was a targeted regex blacklist for the ad networks I actually saw in the query log:
(\.|^)unity3d\.com$
(\.|^)unityads\.unity3d\.com$
(\.|^)applovin\.com$
(\.|^)ironsrc\.com$
(\.|^)supersonicads\.com$
(\.|^)vungle\.com$
(\.|^)liftoff\.io$
(\.|^)chartboost\.com$
(\.|^)adcolony\.com$
(\.|^)tapjoy\.com$
(\.|^)inmobi\.com$
(\.|^)mintegral\.com$
(\.|^)rayjump\.com$
(\.|^)pangle\.io$
(\.|^)moloco\.(com|net|map\.fastly\.net)$
I also blocked Google's common ad hosts directly:
(\.|^)googleads\.g\.doubleclick\.net$
^adservice\.google\.com$
^pagead2\.googlesyndication\.com$
Finally, I added mask.icloud.com, mask-h2.icloud.com, and use-application-dns.net as exact blocks. Those discourage iCloud Private Relay and Firefox's automatic DNS-over-HTTPS path from bypassing the network resolver, but they also disable privacy features. That is a deliberate trade-off, not a requirement for Pi-hole.
6. Where it worked—and where streaming did not
For normal browsing, trackers, and especially ad-heavy mobile games, the result was excellent. Pages felt normal, apps opened normally, and there was no obvious internet slowdown. Unbound can make the first lookup for a new domain a little slower, but caching makes repeat lookups fast enough that I stopped thinking about it.
Streaming was the exception. I experimented with rules like these:
^.*\.mediatailor\.us-east-1\.amazonaws\.com$
^g[0-9]+-vod-us-cmaf-prd-fy\.cdn\.peacocktv\.com$
^star\.fallback\.c10r\.facebook\.com$
They sometimes caught an ad request, but they were not dependable and could stop playback entirely. The reason is architectural: Pi-hole sees domains and cannot separate an ad from content delivered by the same domain. Many streaming services also use server-side ad insertion; AWS describes its implementation as stitching ads directly into the video stream. Others serve manifests, video segments, and ads from the same CDN. At the DNS layer there is no clean “block the ad but allow the episode” decision. Blocking that shared host can remove the commercial—or the whole video.
I kept Pi-hole for what it does well and stopped treating streaming ads as a DNS problem. Browser content blockers can make finer decisions on supported sites; TV and subscription-app ads are much harder because the client often receives one combined stream.
7. Operate it like an appliance
The final build added daily security updates, vnStat bandwidth history, and log2ram to reduce hot writes under /var/log. I also built a static launchpad inside Pi-hole's existing web root. A shell script queried the Pi-hole database and system services every two minutes; the page refreshed every minute without adding another server.
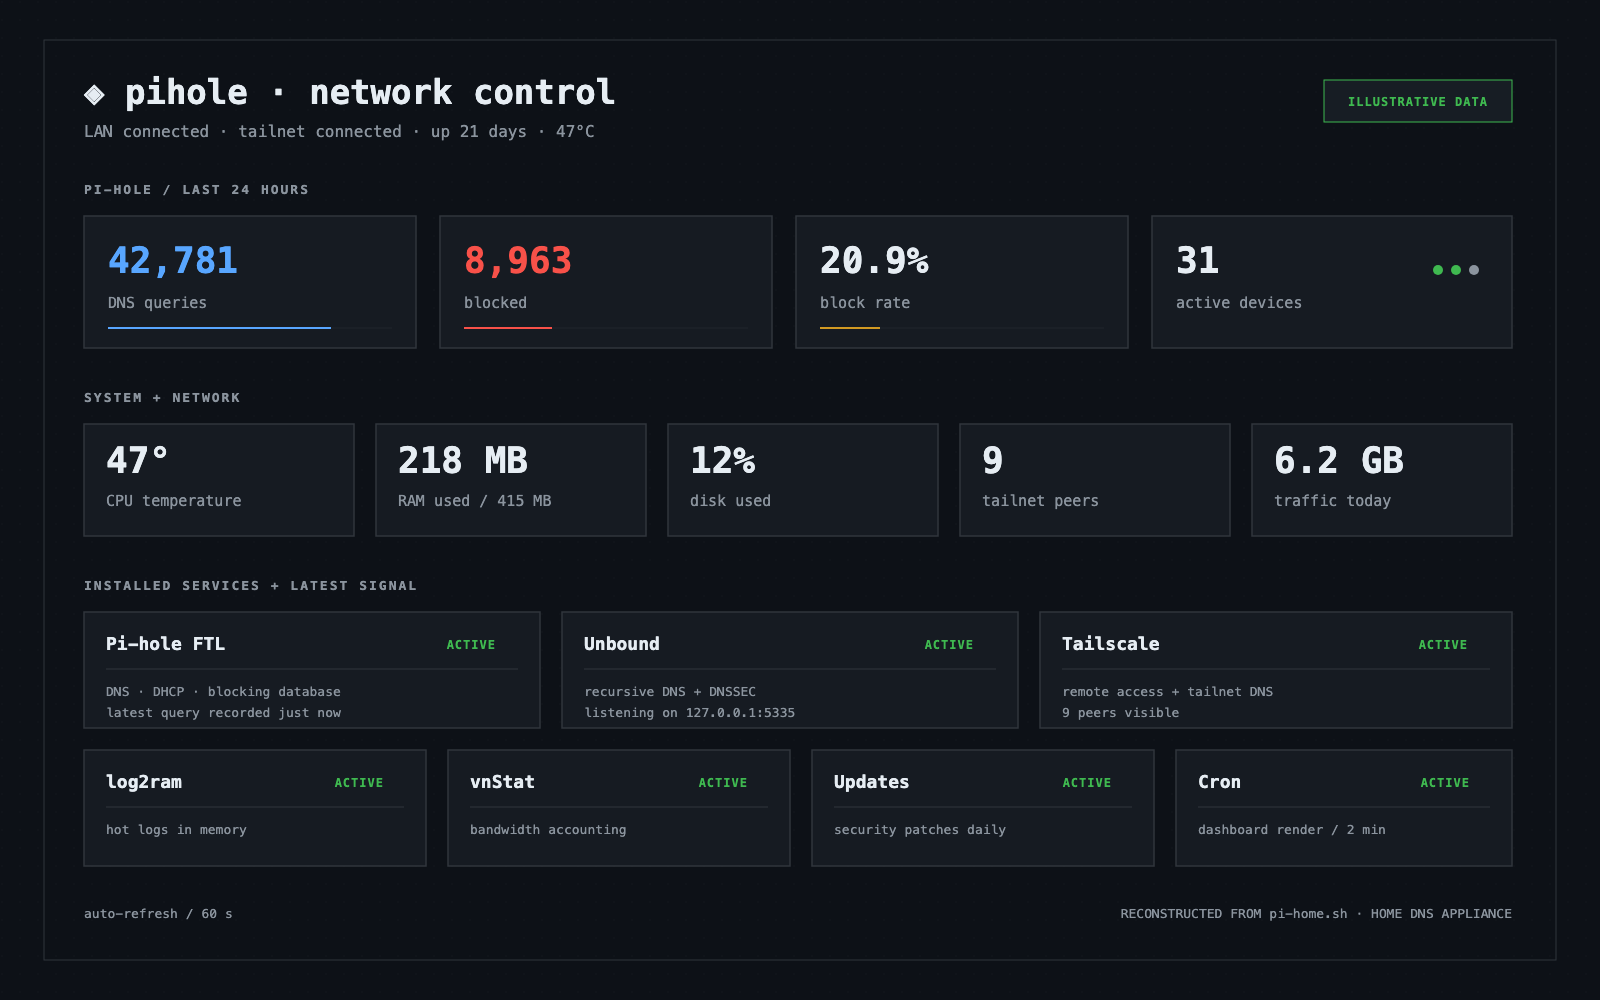
The page made failures obvious: Pi-hole, Unbound, Tailscale, log2ram, vnStat, updates, and cron each had a live status card. That was more useful than another pretty graph because DNS failures make the whole network feel broken.
For a durable install, I would also use a quality power supply, a high-endurance SD card or SSD, automatic configuration backups, and a second resolver if downtime is unacceptable. log2ram helps with system logs, but Pi-hole's long-term query database still lives outside /var/log; it is not a complete answer to SD-card wear.
What I would change next time
| My first build | What I would do next time |
|---|---|
| Pi-hole owned DHCP | Keep DHCP on the router when it can advertise custom DNS |
| Public fallback DNS | Run two Pi-hole instances for both uptime and consistent filtering |
| IPv6 disabled | Configure and verify IPv6 DNS; disable it only as a last resort |
| Large lists and regex | Begin with defaults and add rules from observed queries |
| Unbound workaround in the base config | Start with the official template and document only proven exceptions |
The takeaway
A Pi Zero 2 W can comfortably run Pi-hole, Unbound, and Tailscale, and the actual installation was much easier than I expected. The router and DHCP handoff required the most care; once that was stable, the internet simply felt cleaner. Websites and mobile games benefited immediately, remote filtering worked over Tailscale, and the Pi had plenty of headroom.
It did not become a magic streaming-ad remover, and understanding why made the project more useful: DNS filtering is powerful precisely because it is simple, but that simplicity limits what it can distinguish. For everything else, this has been one of the highest-impact jobs I have given a tiny Raspberry Pi.
References and further reading
- Pi-hole installation documentation — the source of truth for current installation methods.
- Raspberry Pi's Pi-hole tutorial — a clear end-to-end guide covering the Pi, static addressing, router DNS, and DHCP.
- Pi-hole's Unbound guide — the maintained recursive DNS configuration and DNSSEC tests.
- Tailscale's Pi-hole guide — remote filtering, interface settings, and tailnet DNS.
- Pi-hole community explanation of streaming and YouTube ads — why same-domain delivery defeats DNS-level filtering.
- AWS server-side ad insertion documentation — a concrete example of ads being stitched into a video stream.
Videos worth watching
- Block Ads on ALL Devices with a Raspberry Pi by AKZ Dev — a concise 2026 walkthrough using a Pi Zero 2 W, Pi-hole, Tailscale, and Unbound.
- Adblock for your Tailnet with Pi-hole anywhere you go by Tailscale — the official video companion for tailnet-wide filtering.
- World's Greatest Pi-hole Tutorial by Crosstalk Solutions — a detailed setup covering Raspberry Pi Imager, static addressing, the dashboard, blocklists, and Unbound. It predates Pi-hole v6, so some interface labels look different.